Tag: MCP

  • How to Install Context7 MCP for Claude Code (Always-Current Docs Setup)

    Claude Code answers from training data by default — which means library APIs, framework syntax, and CLI flags can be months or years out of date. Context7 fixes that by fetching current, version-matched documentation for whatever library you’re actually using, on demand, instead of relying on what the model memorized during training.

    Quick Start

    Connect the remote server (no local install needed):

    claude mcp add --scope user --transport http context7 https://mcp.context7.com/mcp

    Restart Claude Code, then ask something like “show me a FastAPI example with async endpoints” — if it’s working, the answer will reference current syntax instead of guessing. Total time: about 2 minutes.

    ⚡ Copy This Prompt: Let Claude Code Install and Verify It For You

    Skip Steps 1-3 below and hand the whole thing to the agent instead:

    You have access to the `claude mcp` CLI in this project. Do the following and report back — do not tell me it's done unless step 3 actually confirms it:
    
    1. Run `claude mcp list` to see what's already configured.
    2. Add Context7: `claude mcp add --scope user --transport http context7 https://mcp.context7.com/mcp`
    3. Run `claude mcp list` again and confirm context7 shows as Connected.
    4. Prove it works: use the context7 tools to look up current documentation for [NAME A LIBRARY YOU ACTUALLY USE, e.g. "Next.js" or "Prisma"] and summarize one recent API detail. If step 3 or 4 fails, tell me the exact error instead of reporting success.

    This works because Claude Code can run its own CLI commands and then immediately use the newly connected server — so it proves it can actually pull fresh docs instead of just confirming the config exists.

    What You’ll Need

    Requirement Why You Need It Time
    Claude Code installed Provides the claude mcp command used to register the server 0 min
    Nothing else for basic use The remote server works unauthenticated at low volume 0 min
    A free API key (optional) Removes rate limits and unlocks private-repo lookups — get one at context7.com/dashboard ~1 min

    Step-by-Step Setup

    Prefer to do it by hand instead of delegating to the agent? Here’s the manual version.

    Step 1 — Add the remote server

    ~1 min

    --scope user makes it available in every project on your machine, not just the current one:

    claude mcp add --scope user --transport http context7 https://mcp.context7.com/mcp

    Step 2 — Add an API key to raise the rate limit (optional)

    ~1 min

    Get a free key at context7.com/dashboard, then pass it as a header on the same command:

    claude mcp add --scope user --header "CONTEXT7_API_KEY: YOUR_API_KEY" --transport http context7 https://mcp.context7.com/mcp

    Step 3 — Or run it locally via npx instead

    ~1 min

    If you’d rather not send lookups to the hosted endpoint, run the same server as a local stdio process:

    claude mcp add --scope user context7 -- npx -y @upstash/context7-mcp --api-key YOUR_API_KEY

    Step 4 — Restart and use it

    ~1 min

    Run claude to start a fresh session, then just ask a normal question about a library — Context7 kicks in automatically when it’s relevant, no special syntax required.

    What Each Piece Does

    Piece What It Does
    Remote HTTP endpoint (mcp.context7.com/mcp) Hosted server, no local process to keep running
    CONTEXT7_API_KEY header Raises your rate limit and enables private-repo documentation lookups
    Local npx alternative Same tools, self-hosted — useful if you can’t send traffic to the hosted endpoint
    --scope user Makes the server available in every project on your machine, not just one repo

    Verify It’s Actually Pulling Fresh Docs

    claude mcp list

    ✔ context7    Connected
    context7    Failed to connect

    “Connected” only confirms the handshake. The real test is asking about a library you know has changed recently and checking the answer reflects that:

    What's the current recommended way to set up middleware in [a framework you use]? Use Context7 to check current docs before answering, and tell me which version the docs you pulled are for.

    If the answer cites a specific version and matches what’s actually in that library’s current docs (not what an older training cutoff would guess), it’s working end to end.

    Common Mistakes to Avoid

    • Assuming it’s used automatically every time. Claude decides when a query needs current docs versus when its own knowledge is sufficient — if you want to force it, say “use Context7” explicitly in the prompt.
    • Hitting rate limits on the free unauthenticated tier. Add an API key (Step 2) if you’re using it heavily — it’s free and takes about a minute.
    • Confusing this with a general web search tool. It’s scoped to library/framework/API documentation, not general current events or arbitrary web content.
    • Not restarting after adding the server. Claude Code needs a fresh session or an /mcp panel refresh to pick up a newly added server.

    Q&A

    Do I need an API key to use it at all?

    No — it works unauthenticated at low volume. A free key from context7.com/dashboard just raises the rate limit and adds private-repo access.

    How is this different from just asking Claude directly?

    Claude’s own knowledge has a training cutoff and can be wrong about recent API changes. Context7 fetches the library’s actual current documentation at query time, so the answer reflects what’s true right now, not what was true when the model was trained.

    Does it work for any library?

    It covers a large and growing index of popular libraries and frameworks. For very obscure or brand-new packages, coverage may be incomplete — in that case Claude falls back to its own knowledge.

    Can I remove it later?

    Yes — claude mcp remove context7 deletes it from the config.

    Official Resources

  • How to Connect the GitHub MCP Server to Claude Code (Complete Setup Guide)

    The GitHub MCP server gives Claude Code direct access to your repositories — issues, pull requests, commits, CI status, and code search — without you copy-pasting context back and forth. GitHub maintains an official remote server, so there’s nothing to build or run locally: you authenticate once with a personal access token and Claude Code talks to it over HTTP.

    Quick Start

    Connect the official remote server with one command, once you have a token (see Step 1 below if you don’t have one yet):

    claude mcp add --transport http github https://api.githubcopilot.com/mcp/ --header "Authorization: Bearer YOUR_GITHUB_PAT"

    Restart Claude Code, then run /mcp to confirm it shows as connected. Total time: about 3 minutes, including creating the token.

    ⚡ Copy This Prompt: Let Claude Code Install and Verify It For You

    Once you have a token, skip the manual steps below and hand the rest to the agent:

    You have access to the `claude mcp` CLI in this project. Do the following and report back — do not tell me it's done unless step 3 actually confirms it:
    
    1. Run `claude mcp list` to see what's already configured.
    2. Add the GitHub MCP server: `claude mcp add --transport http github https://api.githubcopilot.com/mcp/ --header "Authorization: Bearer [MY GITHUB PAT]"` (I'll paste my actual token in place of the bracket).
    3. Run `claude mcp list` again and confirm github shows as Connected.
    4. Prove it works: list the open issues in this repository using the GitHub MCP tools. If step 3 or 4 fails, tell me the exact error and the most likely cause (bad token, missing scope, wrong URL) instead of reporting success.

    This works because Claude Code can run its own claude mcp commands and then immediately call the newly connected server — so it proves real repo access instead of just confirming a config entry exists.

    What You’ll Need

    Requirement Why You Need It Time
    Claude Code installed Provides the claude mcp command used to register the server 0 min
    A GitHub personal access token (PAT) Authenticates every request — the remote server has no browser-based OAuth login yet ~2 min
    Repo access on that token The token needs to actually see the repos you want Claude Code to work with included above

    Step-by-Step Setup

    Prefer to do it by hand instead of delegating to the agent? Here’s the manual version.

    Step 1 — Create a GitHub personal access token

    ~2 min

    In GitHub, go to Settings → Developer settings → Personal access tokens → Fine-grained tokens, and generate one scoped to the specific repositories you want Claude Code to access (avoid granting it every repo on your account unless you actually need that).

    Step 2 — Add the remote server

    ~1 min

    Note the trailing slash on the URL — leaving it off is a common source of connection errors:

    claude mcp add --transport http github https://api.githubcopilot.com/mcp/ --header "Authorization: Bearer YOUR_GITHUB_PAT"

    Step 3 — Or run the local Docker version instead

    ~2 min

    If you’d rather not send requests to GitHub’s hosted endpoint, GitHub also publishes an official Docker image you can run locally:

    claude mcp add github -e GITHUB_PERSONAL_ACCESS_TOKEN=YOUR_GITHUB_PAT \
      -- docker run -i --rm -e GITHUB_PERSONAL_ACCESS_TOKEN ghcr.io/github/github-mcp-server

    The remote version above is faster to set up and updates automatically, so it’s the better default unless you have a specific reason to self-host.

    Step 4 — Restart and approve

    ~1 min

    Run claude to start a fresh session. Newly added servers need a restart (or the /mcp panel refresh) before Claude Code can see their tools.

    What Each Piece Does

    Piece What It Does
    Remote HTTP endpoint GitHub-hosted server at api.githubcopilot.com/mcp/ — no local process, always up to date
    Authorization: Bearer header Passes your PAT with every request — this is what scopes what Claude Code can actually see and do
    Fine-grained token scope Limits access to specific repos instead of your whole account — the safer default
    Local Docker alternative Same tools, but self-hosted — useful if you can’t send traffic to GitHub’s hosted endpoint

    Verify the Connection

    claude mcp list

    ✔ github    Connected
    ! github    Needs authentication
    github    Failed to connect

    A “Connected” status only confirms the handshake, not that the token can actually see your repos. Confirm real access with an in-session prompt:

    Using the GitHub MCP tools, list the 5 most recently updated issues in [owner/repo].

    If it comes back with real issue titles instead of an auth or permissions error, the token and scope are both working.

    Common Mistakes to Avoid

    • Dropping the trailing slash on the URL. /mcp without the final / is a frequent cause of connection failures on the remote endpoint.
    • Granting a classic token full account access. Use a fine-grained token scoped to only the repos Claude Code actually needs to touch.
    • Hardcoding the token directly in a committed .mcp.json. Keep it in an environment variable or add the server at user scope instead of project scope if the config would otherwise be shared.
    • Assuming “Connected” means full repo access. The handshake can succeed while the token still lacks scope for a specific repo — test with a real query, not just claude mcp list.
    • Not restarting after adding the server. Claude Code needs a fresh session or an /mcp panel refresh to pick up a newly added server.

    Q&A

    Can I use browser-based OAuth instead of a token?

    Not yet for GitHub’s remote server — unlike some other MCP servers, it currently requires a personal access token rather than a one-click OAuth login inside Claude Code.

    Should I use the remote server or the Docker version?

    Remote is the better default — it’s faster to set up, needs no local process, and updates automatically. Use Docker only if you specifically can’t send traffic to GitHub’s hosted endpoint.

    What can Claude Code actually do with this connected?

    Read and search code, open and comment on issues and pull requests, check CI/workflow status, and browse commit history — scoped to whatever your token can access.

    Why does it show “Needs authentication”?

    Usually a missing, expired, or incorrectly scoped token. Regenerate it in GitHub settings and re-run the claude mcp add command with the new value.

    Can I remove it later?

    Yes — claude mcp remove github deletes it from the config.

    Official Resources

  • How to Install the Playwright MCP Server for Claude Code (Browser Automation Setup)

    Playwright MCP is Microsoft’s official browser automation server — it lets Claude Code open a real browser, click through a page, read the actual rendered text, and fill in forms, using accessibility snapshots instead of pixel screenshots. It’s become one of the most-installed MCP servers precisely because it turns “describe this page to me” from a guess into an actual read.

    Quick Start

    Add it as a local stdio server — no separate install step, npx handles it on first run.

    claude mcp add --transport stdio playwright -- npx -y @playwright/mcp@latest

    Restart Claude Code, then run /mcp inside a session to confirm it shows as connected. Total time: about 2 minutes.

    ⚡ Copy This Prompt: Let Claude Code Install and Verify It For You

    Skip Steps 1-4 below and hand the whole thing to the agent instead:

    You have access to the `claude mcp` CLI in this project. Do the following and report back — do not tell me it's done unless step 4 actually confirms it:
    
    1. Run `claude mcp list` to see what's already configured.
    2. Add the Playwright MCP server: `claude mcp add --transport stdio playwright -- npx -y @playwright/mcp@latest`
    3. Run `claude mcp list` again and confirm playwright shows as Connected.
    4. Open a real page to prove it works: navigate to https://example.com and read back the page's main heading text. If step 4 fails, tell me the exact error instead of reporting success.

    This works because Claude Code can run its own CLI commands and then immediately use the newly connected server — so the agent proves the browser actually works instead of just confirming the config exists.

    What You’ll Need

    Requirement Why You Need It Time
    Claude Code installed Provides the claude mcp command used to register the server 0 min
    Node.js Playwright MCP runs via npx — no separate download needed beyond this ~5 min if missing
    ~300MB free disk space First run downloads a Chromium build for Playwright to drive ~1 min

    Step-by-Step Setup

    Prefer to do it by hand instead of delegating to the agent? Here’s the manual version.

    Step 1 — Add the server

    ~1 min

    The -- separates Claude’s own flags from the command that launches the server:

    claude mcp add --transport stdio playwright -- npx -y @playwright/mcp@latest

    Step 2 — Run it headless (optional, faster in CI or background use)

    ~1 min

    By default the browser runs headed (a visible window). For faster, invisible runs — especially useful when Claude Code is doing background verification work — add --headless and --isolated so each session starts from a clean profile instead of reusing saved cookies:

    claude mcp add --transport stdio playwright -- npx -y @playwright/mcp@latest --headless --isolated

    Step 3 — Pick a specific browser engine (optional)

    ~1 min

    Defaults to Chromium. To test against Firefox or WebKit instead, pass --browser:

    claude mcp add --transport stdio playwright -- npx -y @playwright/mcp@latest --browser firefox

    Step 4 — Restart and approve

    ~1 min

    Run claude to start a fresh session. Newly added servers need a restart (or the /mcp panel refresh) before Claude Code can see their tools.

    What Each Flag Does

    Flag What It Does
    --headless Runs the browser with no visible window — headed (visible) is the default
    --isolated Keeps the browser profile in memory only, so every session starts fresh instead of reusing saved logins/cookies
    --browser Chooses the engine: chromium, firefox, webkit, or msedge
    --vision Switches from accessibility snapshots to actual screenshots — slower and less reliable, only use it if a page genuinely needs visual inspection
    --device Emulates a specific device, e.g. "iPhone 15", for responsive/mobile testing

    Verify the Connection

    Check that it’s registered and healthy:

    claude mcp list

    ✔ playwright    Connected
    playwright    Failed to connect

    A config entry showing up is not the same as it working — the real test is asking Claude Code to actually drive the browser. In a session, ask it to navigate to a real page and read something back:

    Navigate to https://example.com using the playwright MCP tools and tell me the exact text of the page's main heading.

    If it comes back with the actual heading text (“Example Domain”), the browser is genuinely working end to end — not just listed as connected.

    Common Mistakes to Avoid

    • Forgetting the -- separator. Without it, Claude Code can’t tell where its own flags end and the server’s launch command begins.
    • Assuming “Connected” means the browser itself works. The MCP handshake can succeed even if the first real navigation later fails — always test with an actual page load, not just claude mcp list.
    • Running headed by default in a CI or background context. If there’s no display available, add --headless or the browser launch will fail.
    • Reaching for --vision by default. Accessibility snapshots (the default) are faster and more reliable than screenshots for almost every task — only switch to --vision when a page’s layout genuinely can’t be understood from its accessibility tree.
    • Not restarting after adding the server. Claude Code needs a fresh session or an /mcp panel refresh to pick up a newly added server.

    Q&A

    Does this take screenshots of every page?

    No, by default it reads the page’s accessibility tree (an accessibility snapshot) rather than capturing pixels — that’s faster and lets Claude read actual text and structure instead of interpreting an image. Screenshots are only used if you pass --vision.

    Will this affect my regular browser’s saved logins?

    Not if you use --isolated — that keeps each session’s profile in memory only. Without it, Playwright MCP uses a persistent profile stored in a separate cache directory, not your regular browser’s profile.

    Can I have the agent test my own site with this?

    Yes — that’s one of the most common uses: ask Claude Code to navigate your local dev server or a staging URL, click through a flow, and report back what it actually saw rendered.

    Why does it fail in a CI environment?

    Usually a missing display for headed mode — add --headless, and if Chromium itself is missing in the CI image, its first-run download step needs network access.

    Can I remove it later?

    Yes — claude mcp remove playwright deletes it from the config.

    Official Resources

  • How to Connect an MCP Server to Claude Code (Complete Setup Guide)

    How to Connect an MCP Server to Claude Code (Complete Setup Guide)

    MCP (Model Context Protocol) servers give Claude Code access to outside tools and data — a Notion workspace, a Playwright browser, a private API. Claude Code has a built-in claude mcp command for adding, checking, and removing these servers without touching a config file by hand. This guide walks through both connection types and how to confirm one actually works.

    Quick Start

    Connect a remote HTTP-based MCP server in one line — no local install, no package to run.

    claude mcp add --transport http notion https://mcp.notion.com/mcp

    Restart Claude Code, then run /mcp inside a session to see it listed as connected. Total time: about 2 minutes.

    ⚡ Copy This Prompt: Let Claude Code Install and Verify It For You

    Skip Steps 1-5 below entirely and hand the whole thing to the agent instead. Fill in the bracketed line with the server you want, paste the rest as-is:

    You have access to the `claude mcp` CLI in this project. Do the following and report back — do not tell me it's done unless step 3 actually confirms it:
    
    1. Run `claude mcp list` to see what's already configured.
    2. Add this MCP server: [PASTE THE SERVER'S NAME, URL/PACKAGE, AND TRANSPORT TYPE HERE — e.g. "notion, https://mcp.notion.com/mcp, http" or "airtable, npx -y airtable-mcp-server, stdio with AIRTABLE_API_KEY=..."]
    3. Run `claude mcp list` again and confirm the server shows as Connected.
    4. If it does NOT show Connected, do not report success. Tell me: the exact status shown, the most likely cause (missing auth, wrong URL/package name, missing prerequisite), and the specific command to fix it.

    This works because Claude Code can run its own CLI commands in a session — it adds the server, re-checks the connection, and only tells you it’s done once claude mcp list actually agrees.

    What You’ll Need

    RequirementWhy You Need ItTime
    Claude Code installedThe claude mcp command ships with it — nothing extra to install0 min
    An MCP server URL or package nameWhat you’re actually connecting to (remote HTTP endpoint or local npm package)~1 min to find
    Node.js (for local servers only)Most stdio MCP servers run via npx~5 min if missing
    API key or token (some servers)Private servers need auth headers or env vars to connect~2 min

    Step-by-Step Setup

    Prefer to do it by hand instead of delegating to the agent? Here’s the manual version of the same steps.

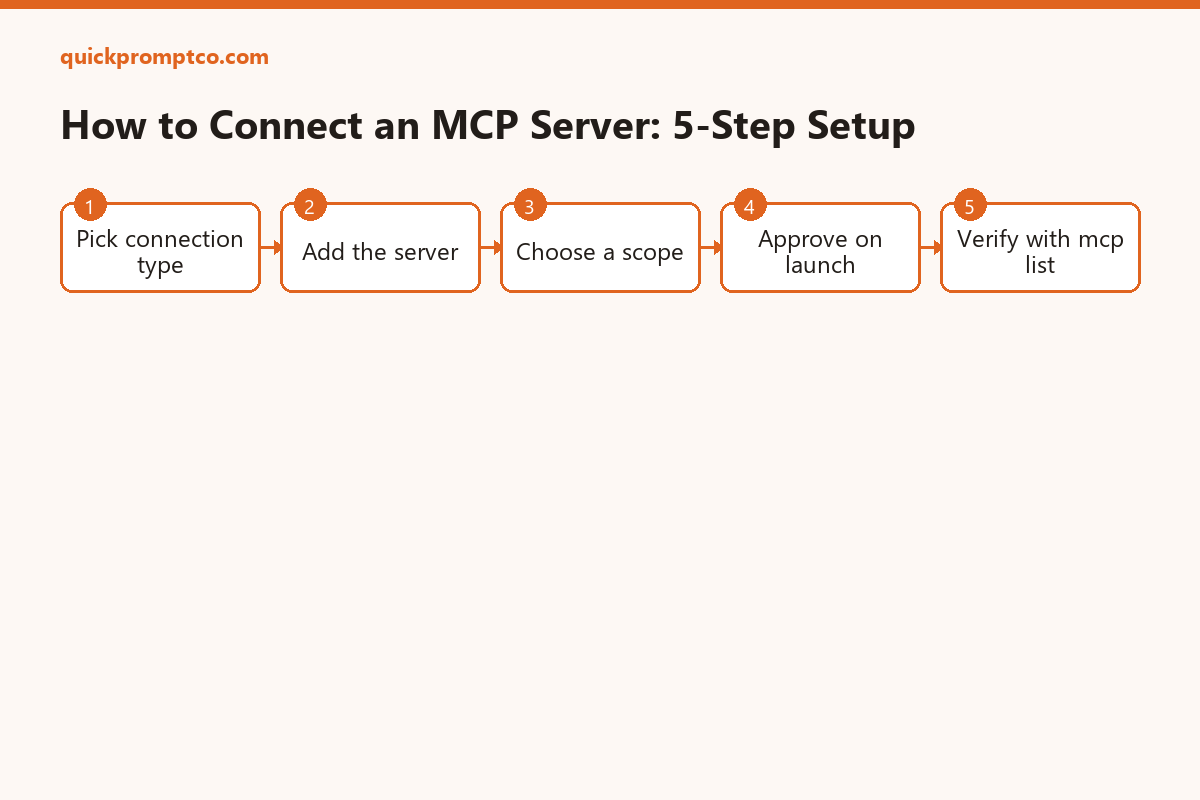
    Step 1 — Pick a connection type

    ~1 min

    Remote HTTP is the recommended default — the server runs elsewhere and Claude Code just connects over the network. Local stdio runs the server as a process on your own machine, usually via npx. Use HTTP whenever the tool offers it; fall back to stdio for local-only tools like a filesystem or browser server.

    Step 2 — Add a remote HTTP server

    ~1 min

    Basic syntax, plus a real example connecting to Notion:

    claude mcp add --transport http notion https://mcp.notion.com/mcp

    If the server needs a bearer token, pass it with --header:

    claude mcp add --transport http secure-api https://api.example.com/mcp \
      --header "Authorization: Bearer your-token"

    Step 3 — Or add a local stdio server

    ~2 min

    Use -- to separate Claude’s own options from the command that launches the server. Example: adding the Airtable server with an API key passed as an environment variable:

    claude mcp add --env AIRTABLE_API_KEY=YOUR_KEY --transport stdio airtable \
      -- npx -y airtable-mcp-server

    Step 4 — Choose a scope

    ~1 min

    User scope makes the server available across every project on your machine. Project scope writes the server definition into a .mcp.json file in the project root, so it can be committed and shared with teammates:

    claude mcp add --scope user --transport http claude-code-docs https://code.claude.com/docs/mcp
    claude mcp add --scope project --transport http claude-code-docs https://code.claude.com/docs/mcp

    A project-scoped server can also be defined directly in .mcp.json:

    {
      "mcpServers": {
        "claude-code-docs": { "type": "http", "url": "https://code.claude.com/docs/mcp" },
        "playwright": { "type": "stdio", "command": "npx", "args": ["-y", "@playwright/mcp@latest"] }
      }
    }

    Step 5 — Approve and start using it

    ~1 min

    Run claude to start an interactive session. On first launch, project-scoped servers from .mcp.json show a one-time approval prompt — accept it, and the server’s tools become available in that session.

    What Each Piece Does

    PieceWhat It Does
    Transport (http / stdio)How Claude Code talks to the server — over the network, or as a local process
    Scope (user / project / local)Who can see the server — just you everywhere, or a shared project team
    .mcp.jsonThe project-level config file that lists shared servers, meant to be committed
    --header / --envPasses auth tokens or API keys to the server without hardcoding them in the command
    /mcp panelIn-session view of every connected server and its live status

    Verify the Connection

    List every configured server and its health at a glance:

    claude mcp list

    Here’s what the status column actually looks like, and what each one means:

    ✔ notion    Connected
    ! secure-api    Needs authentication
    airtable    Failed to connect
    claude-code-docs    Pending approval (run claude to approve)

    ✔ Connected is the only state that means “working.” Everything else needs action: ! Needs authentication (add the missing token), ✘ Failed to connect (check the URL or package name), ⏸ Pending approval (run claude interactively and accept it). For one server’s full detail:

    claude mcp get notion

    Common Mistakes to Avoid

    • Forgetting the -- separator on stdio servers. Without it, Claude Code can’t tell where its own flags end and the server’s launch command begins.
    • Hardcoding API keys directly in the URL or command. Use --header or --env instead, so secrets aren’t sitting in your shell history or a committed .mcp.json.
    • Assuming a listed server is actually working. A server appears in claude mcp list as soon as it’s configured — always check the status column, don’t assume “listed” means “connected.”
    • Not restarting after adding a server. Claude Code needs a fresh session (or the /mcp panel refresh) to pick up a newly added server.
    • Ignoring a pending-approval status. Project-scoped servers from a teammate’s .mcp.json sit unapproved until you run claude interactively and accept the prompt.

    Q&A

    What’s the difference between user scope and project scope?

    User scope is private to you and active in every project. Project scope lives in .mcp.json in the repo, so it’s shared with anyone who clones it — useful for team-standard tools.

    Do I need to know how to code to use MCP servers?

    No. Adding one is a single CLI command, and once connected, Claude Code calls its tools automatically when relevant — no manual invocation required.

    Can I just have the agent do the whole setup?

    Yes — that’s what the copy-paste prompt above is for. Claude Code can run its own claude mcp commands in a session, so it can add a server and re-check the connection itself instead of you typing each command.

    Can I remove a server later?

    Yes — claude mcp remove <name> deletes it from config, and for remote servers it also clears any stored OAuth tokens.

    Why does a server show “Failed to connect”?

    Usually a wrong URL, a missing auth header, or the local package failing to start. Run claude mcp get <name> for the specific error before troubleshooting further.

    Official Resources